Sunday, March 6, 2022

Deploying a microservice to Docker-Desktop's Kubernetes on Windows using Helm

What follows is a description of how to deploy a Springboot websocket microservice to a Kubernetes cluster running in Docker-Desktop. The prerequisites for the deployment are:

  1. The Springboot app has been dockerized
  2. Docker-Desktop (4.4.3) has been installed and Kubernetes (v1.22.5) enabled.
  3. kubectl (v1.22.5) has been configured to connected to k8 cluster started with Docker-Desktop
  4. Helm(v3.8.0) has been installed.
Create a subfolder in the Springboot project directory called helm. Below one see the result in Intellij and the contents of the simple Dockefile as well.


Change into the helm directory and run:

>helm create name-of-project   //here ergregatta-messaging-service


The Helm Chart Template Guild is a good place to learn about contents of the generated folder.

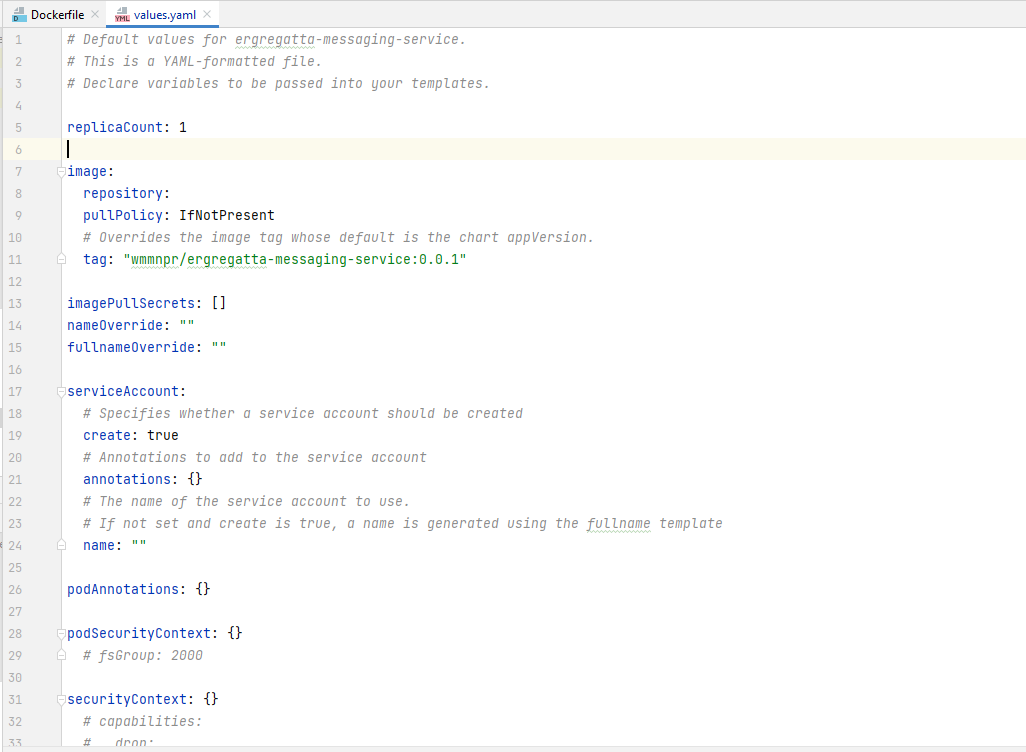
In the values.yaml file in the newly generated folder there were only a few things that had to be changed. The first and most obvious one being the "image.tag", shown below. It was set to point to the image in my local Docker image repository which came as a result of running docker build command.


Other changes, included, setting "ingress.enabled" to true and setting the "ingress.className" to "nginx". Which brings us to the next step.  Before deploying the microservice, one must deploy an ingress controller, which in this case was ingress-nginx. The helm command to do so was:

>helm install ingress-nginx ingress-nginx --repo https://kubernetes.github.io/ingress-nginx --namespace ingress-nginx --create-namespace

I also had to change the targetPort in the service.yaml file to match that of the port configured in the Dockerfile.

Also the hostname at which the microservice (k8 service) will be available to the outside needs to be configured in the values.yaml. The value in this case was:

ingress.hosts.host: rowwithme 

However, the hostname will only function properly if one, on Windows, adds it to the C:\Windows\System32\drivers\etc\hosts file. As in:

127.0.0.1 rowwithme 

Now, deploy the microservice by running:

>helm install rowwithme ergregatta-messaging-servic


Ok, maybe I should have used wscat but with the above screenshot one can see that the request is being forwarded to microservice running the the pod listening on port 5000

With kubectl once can see that ingress mapping has been processed by the ingress controller because othe the "HOSTS" column show below.


Sunday, February 13, 2022

Debugging Apache Airflow with debugpy and VS Code while running in Docker

To be able to debug Apache Airflow using Visual Studio Code, we first want to build a Docker image from the sources. Start by cloning the apache airflow github repository and then open the folder using VS Code.

In the Dockerfile, change the following values:

ARG AIRFLOW_INSTALLATION_METHOD="."

ARG AIRFLOW_SOURCES_WWW_FROM="airflow/www"
ARG AIRFLOW_SOURCES_WWW_TO="/opt/airflow/airflow/www"

ARG AIRFLOW_SOURCES_FROM="."
ARG AIRFLOW_SOURCES_TO="/opt/airflow"

Then build the image with the new settings and then run it but overriding the entry point:


docker build -t my-image:0.0.1 -f Dockerfile .

docker run -p 8080:8080 -p 5678:5678 --entrypoint /bin/bash -it my-image:0.0.1

In the container, first install debugpy.


pip install debugpy

We'll need the installed location of the airflow code for our launch.json configuration file. You can find it by running:


python -m pip -V
pip 21.3.1 from /home/airflow/.local/lib/python3.7/site-packages/pip (python 3.7)

Now, while in the running container, start airflow, here I'll just call --help, in the container with:


python -m debugpy --listen 0.0.0.0:5678 --wait-for-client -m airflow --help

In the cloned repository directory, create a launch.json file in the .vscode directory. The value for remoteRoot should be taken from the output of the "python -m pip -V" above 


    "version": "0.2.0",
    "configurations": [
        {
            "name": "Python: Remote Attach",
            "type": "python",
            "request": "attach",
            "justMyCode": false,
            "connect": {
                "host": "localhost",
                "port": 5678
            },
            "pathMappings": [
                {
                    "localRoot": "${workspaceFolder}/airflow",
                    "remoteRoot": "/home/airflow/.local/lib/python3.7/site-packages/airflow"
                }
            ]
        }
    ]
}

In VS Code open the __main__.py file in the apache folder of the project and place your break points. Now run the debug using the launch.json file:


Of course the "Here we go!!!!" is from me :>)


Sunday, January 30, 2022

Deploying Airflow on AWS eks and exposing the webserver UI for learning purposes.

This description assumes that you already have a AWS account. It reveals nothing new and only extracts or copies the instructions created by some real pros (unlike the hacker of this how-to) from the following links:


Most of the cluster work was done on an Amazon Linux instance with kubectl, eksctl and helm installed.

First create an eks cluster as follows:

eksctl create cluster \

--name dev-apps \
--region eu-central-1 \
--version 1.21 \
--nodegroup-name linux-nodes \
--nodes 1 \
--nodes-min 1 \
--nodes-max 2 \
--with-oidc \
--ssh-access \
--ssh-public-key ergregatta-20200928 \
--managed

 What follows is not necessary, however, it is nice for learning purposes to install the kubernetes dashboard. To do so following the instructions here or skip down to where we install airflow with helm:

https://docs.aws.amazon.com/eks/latest/userguide/dashboard-tutorial.html

Here you will have to run the kubectl proxy from your laptop and to do so you’ll need the aws cli as well as kubectl installed.

 
$aws eks update-kubeconfig --region eu-central-1 --name dev-apps
 

This will configure the local kubectl to work with the cluster created above.

Then to get a token to use later for accessing the console in the browser run this (here run in gitbash):

$ kubectl -n kube-system describe secret $(kubectl -n kube-system get secret | grep eks-admin | awk '{print $1}')
Name:         eks-admin-token-rswtg
Namespace:    kube-system
Labels:       <none>
Annotations:  kubernetes.io/service-account.name: eks-admin
              kubernetes.io/service-account.uid: 01be9965-5fd5-469e-97e6-6bb6e0c5c5f9
 
Type:  kubernetes.io/service-account-token
 
Data
====
token:      eyJhbGciOiJSUzI1NiIsImtpZCI6Im0wUXZrTE1NeTZNdHlNd3B4U25UOGI2aTVyc2tpUl9BNDJ3M2k1ZGYtQ1UifQ.eyJpc3MiOiJrdWJlcm5ldGVzL3NlcnZpY2VhY2NvdW50Iiwia3ViZXJuZXRlcy5pby9zZXJ2aWNlYWNjb3VudC9uYW1lc3BhY2UiOiJrdWJlLXN5c3RlbSIsImt1YmVybmV0ZXMuaW8vc2VydmljZWFjY291bnQvc2VjcmV0Lm5hbWUiOiJla3MtYWRtaW4tdG9rZW4tcnN3dGciLCJrdWJlcm5ldGVzLmlvL3NlcnZpY2VhY2NvdW50L3NlcnZpY2UtYWNjb3VudC5uYW1lIjoiZWtzLWFkbWluIiwia3ViZXJuZXRlcy5pby9zZXJ2aWNlYWNjb3VudC9zZXJ2aWNlLWFjY291bnQudWlkIjoiMDFiZTk5NjUtNWZkNS00NjllLTk3ZTYtNmJiNmUwYzVjNWY5Iiwic3ViIjoic3lzdGVtOnNlcnZpY2VhY2NvdW50Omt1YmUtc3lzdGVtOmVrcy1hZG1pbiJ9.fnHn42Z5gNJ3ZzGebIo7Fo1t8gd1EsGXdDtq9TxcZalcGICRPd3B-8Kwy8CT4-qYEDrNTX27heDTbIJmgod5eZxbFDZMTPyzRKcuk_T1TXFiSfCLRi4wtlWgT-E_5EIJTteqbWk-GvrmTr1O4vmIzNA-8Y4d2sinEGYbESmT8jOK26KmwPKuizKxrzZGYSIL9so3cHuSRe-33IeS0XYR1rk7uU2NDTAGSKMA3-wYLk9heSVdReMfDC__DKlRGR6GMb18jxqi5C08mqJyR7DPVjnR4WTpAh9MO-7SqEQiW6MEsWmHgDbHFIPYg_TN7xPDp3fT5pbbBR70jX8ka2sFog
ca.crt:     1066 bytes


Then start the proxy

 
$kubectl proxy
 

and go to localhost as instructed in the instructions and use the token above to log into the dashboard.

Now, that the optional installation of the dashboard is done, let’s return to installing airflow into the eks cluster by using the helm chart as described here:

https://airflow.apache.org/docs/helm-chart/stable/index.html

If you have the dashboard installed, then you can browse around and see all the components which have been installed for airflow.

Next we have to make the service available through the internet which we shall to because exposing the airflow-webserver k8 service by following these instructions:

https://www.eksworkshop.com/beginner/130_exposing-service/exposing/

Replace the namespace, in the above instructions, with “airflow” and the service with “airflow-webserver”. With this done, you should be able to access the airflow-webserver via http and login with admin/admin (non of which is secure)

To delete everything just run:

 
$eksctl delete cluster --name  dev-apps^
 

and say good-bye.