Sunday, January 30, 2022

Deploying Airflow on AWS eks and exposing the webserver UI for learning purposes.

This description assumes that you already have a AWS account. It reveals nothing new and only extracts or copies the instructions created by some real pros (unlike the hacker of this how-to) from the following links:


Most of the cluster work was done on an Amazon Linux instance with kubectl, eksctl and helm installed.

First create an eks cluster as follows:

eksctl create cluster \

--name dev-apps \
--region eu-central-1 \
--version 1.21 \
--nodegroup-name linux-nodes \
--nodes 1 \
--nodes-min 1 \
--nodes-max 2 \
--with-oidc \
--ssh-access \
--ssh-public-key ergregatta-20200928 \
--managed

 What follows is not necessary, however, it is nice for learning purposes to install the kubernetes dashboard. To do so following the instructions here or skip down to where we install airflow with helm:

https://docs.aws.amazon.com/eks/latest/userguide/dashboard-tutorial.html

Here you will have to run the kubectl proxy from your laptop and to do so you’ll need the aws cli as well as kubectl installed.

 
$aws eks update-kubeconfig --region eu-central-1 --name dev-apps
 

This will configure the local kubectl to work with the cluster created above.

Then to get a token to use later for accessing the console in the browser run this (here run in gitbash):

$ kubectl -n kube-system describe secret $(kubectl -n kube-system get secret | grep eks-admin | awk '{print $1}')
Name:         eks-admin-token-rswtg
Namespace:    kube-system
Labels:       <none>
Annotations:  kubernetes.io/service-account.name: eks-admin
              kubernetes.io/service-account.uid: 01be9965-5fd5-469e-97e6-6bb6e0c5c5f9
 
Type:  kubernetes.io/service-account-token
 
Data
====
token:      eyJhbGciOiJSUzI1NiIsImtpZCI6Im0wUXZrTE1NeTZNdHlNd3B4U25UOGI2aTVyc2tpUl9BNDJ3M2k1ZGYtQ1UifQ.eyJpc3MiOiJrdWJlcm5ldGVzL3NlcnZpY2VhY2NvdW50Iiwia3ViZXJuZXRlcy5pby9zZXJ2aWNlYWNjb3VudC9uYW1lc3BhY2UiOiJrdWJlLXN5c3RlbSIsImt1YmVybmV0ZXMuaW8vc2VydmljZWFjY291bnQvc2VjcmV0Lm5hbWUiOiJla3MtYWRtaW4tdG9rZW4tcnN3dGciLCJrdWJlcm5ldGVzLmlvL3NlcnZpY2VhY2NvdW50L3NlcnZpY2UtYWNjb3VudC5uYW1lIjoiZWtzLWFkbWluIiwia3ViZXJuZXRlcy5pby9zZXJ2aWNlYWNjb3VudC9zZXJ2aWNlLWFjY291bnQudWlkIjoiMDFiZTk5NjUtNWZkNS00NjllLTk3ZTYtNmJiNmUwYzVjNWY5Iiwic3ViIjoic3lzdGVtOnNlcnZpY2VhY2NvdW50Omt1YmUtc3lzdGVtOmVrcy1hZG1pbiJ9.fnHn42Z5gNJ3ZzGebIo7Fo1t8gd1EsGXdDtq9TxcZalcGICRPd3B-8Kwy8CT4-qYEDrNTX27heDTbIJmgod5eZxbFDZMTPyzRKcuk_T1TXFiSfCLRi4wtlWgT-E_5EIJTteqbWk-GvrmTr1O4vmIzNA-8Y4d2sinEGYbESmT8jOK26KmwPKuizKxrzZGYSIL9so3cHuSRe-33IeS0XYR1rk7uU2NDTAGSKMA3-wYLk9heSVdReMfDC__DKlRGR6GMb18jxqi5C08mqJyR7DPVjnR4WTpAh9MO-7SqEQiW6MEsWmHgDbHFIPYg_TN7xPDp3fT5pbbBR70jX8ka2sFog
ca.crt:     1066 bytes


Then start the proxy

 
$kubectl proxy
 

and go to localhost as instructed in the instructions and use the token above to log into the dashboard.

Now, that the optional installation of the dashboard is done, let’s return to installing airflow into the eks cluster by using the helm chart as described here:

https://airflow.apache.org/docs/helm-chart/stable/index.html

If you have the dashboard installed, then you can browse around and see all the components which have been installed for airflow.

Next we have to make the service available through the internet which we shall to because exposing the airflow-webserver k8 service by following these instructions:

https://www.eksworkshop.com/beginner/130_exposing-service/exposing/

Replace the namespace, in the above instructions, with “airflow” and the service with “airflow-webserver”. With this done, you should be able to access the airflow-webserver via http and login with admin/admin (non of which is secure)

To delete everything just run:

 
$eksctl delete cluster --name  dev-apps^
 

and say good-bye.

Sunday, May 2, 2021

Windows 10, bleno and WinUSB

I am using bleno to simulate a Bluetooth device for a mobile app I am working on. The problem is that for bleno to work on Windows one must install the WinUSB driver and if the WinUSB is installed rather the the default driver then it's hard, on a Dell latitude, to power on Bluetooth because the control button will not appear in the Action Center menu as shown in the following image.


Because the button was missing, I didn't have any information about whether the device was on or off. I only knew that Bluetooth must be off because a "poweredOff" event was being triggered during the start up of my application. Attempts to power on the Bluetooth with Power Shell also failed. 

The steps I am about to describe below should help one be able to work with bleno on Windows without too many hassles.

First make sure the default Bluetooth driver is installed and that the Bluetooth button appears in the Action Center menu as shown above and that Bluetooth is on.  In the Device Manager, it should look as follows:


Next install WinUSB; 
preferably using Zadig.


After installation, the Device Manager should appear as follows and it should be possible to open the Bluetooth device using bleno.


When one is done working with bleno, then roll back the WinUSB driver. This way the Bluetooth on/off button will be visible should the Bluetooth device turn itself off once the laptop is closed or shutdown. Following these above steps allowed me to work with bleno without too many hassles and without annoying computer restarts. 


Tuesday, August 18, 2020

Private Policy for ErgRegatta App

Thanks to:  https://app-privacy-policy-generator.firebaseapp.com/ for creating this Private Policy for the App.

Privacy Policy

William Pennoyer built the ErgRegatta app as a Free app. This SERVICE is provided by William Pennoyer at no cost and is intended for use as is.

This page is used to inform visitors regarding my policies with the collection, use, and disclosure of Personal Information if anyone decided to use my Service.

If you choose to use my Service, then you agree to the collection and use of information in relation to this policy. The Personal Information that I collect is used for providing and improving the Service. I will not use or share your information with anyone except as described in this Privacy Policy.

The terms used in this Privacy Policy have the same meanings as in our Terms and Conditions, which is accessible at ErgRegatta unless otherwise defined in this Privacy Policy.

Information Collection and Use

For a better experience, while using our Service, I may require you to provide us with certain personally identifiable information, including but not limited to email address. The information that I request will be retained on your device and is not collected by me in any way.

The app does use third party services that may collect information used to identify you.

Link to privacy policy of third party service providers used by the app

Log Data

I want to inform you that whenever you use my Service, in a case of an error in the app I collect data and information (through third party products) on your phone called Log Data. This Log Data may include information such as your device Internet Protocol (“IP”) address, device name, operating system version, the configuration of the app when utilizing my Service, the time and date of your use of the Service, and other statistics.

Cookies

Cookies are files with a small amount of data that are commonly used as anonymous unique identifiers. These are sent to your browser from the websites that you visit and are stored on your device's internal memory.

This Service does not use these “cookies” explicitly. However, the app may use third party code and libraries that use “cookies” to collect information and improve their services. You have the option to either accept or refuse these cookies and know when a cookie is being sent to your device. If you choose to refuse our cookies, you may not be able to use some portions of this Service.

Service Providers

I may employ third-party companies and individuals due to the following reasons:

  • To facilitate our Service;
  • To provide the Service on our behalf;
  • To perform Service-related services; or
  • To assist us in analyzing how our Service is used.

I want to inform users of this Service that these third parties have access to your Personal Information. The reason is to perform the tasks assigned to them on our behalf. However, they are obligated not to disclose or use the information for any other purpose.

Security

I value your trust in providing us your Personal Information, thus we are striving to use commercially acceptable means of protecting it. But remember that no method of transmission over the internet, or method of electronic storage is 100% secure and reliable, and I cannot guarantee its absolute security.

Links to Other Sites

This Service may contain links to other sites. If you click on a third-party link, you will be directed to that site. Note that these external sites are not operated by me. Therefore, I strongly advise you to review the Privacy Policy of these websites. I have no control over and assume no responsibility for the content, privacy policies, or practices of any third-party sites or services.

Children’s Privacy

These Services do not address anyone under the age of 13. I do not knowingly collect personally identifiable information from children under 13. In the case I discover that a child under 13 has provided me with personal information, I immediately delete this from our servers. If you are a parent or guardian and you are aware that your child has provided us with personal information, please contact me so that I will be able to do necessary actions.

Changes to This Privacy Policy

I may update our Privacy Policy from time to time. Thus, you are advised to review this page periodically for any changes. I will notify you of any changes by posting the new Privacy Policy on this page.

This policy is effective as of 2020-08-18

Contact Us

If you have any questions or suggestions about my Privacy Policy, do not hesitate to contact me at wmmnpr36@gmail.com.

This privacy policy page was created at privacypolicytemplate.net and modified/generated by App Privacy Policy Generator

Sunday, December 3, 2017

How to obtain the contents of a static ThreadLocal by subclassing the Thread class.

To thoroughly unit test a Spring @Async method, it was necessary to check the contents of a static ThreadLocal being used by the method after the method had finished executing.

Because the contents of a static ThreadLocal variable, unlike a normal static variable,  are not shared between thread executions even though the variable has the same object id in all execution contexts, it was not possible to call the @Async method and then just check the static ThreadLocal in the test Thread after the execution of the method had finished.

To access the contents of a static ThreadLocal used by the @Async method, it was necessary to subclass the Thread class and register the subclass with the ThreadFactory being used by the Spring AsyncTaskExecutor.

When the AsyncTaskExecutor needed a Thread to execute the @Async method, it instantiated one of the subclassed Threads and passed it a reference to a Runnable, which was the Runnable of the @Async method.

Eventaully when the AsyncTaskExecutor started the subclassed Thread,  the subclassed Thread first called the @Async method by calling "run" on the Runnable it had been passed during construction and then accessed the static ThreadLocal afterwards. The contents of the ThreadLocal was then passed back to the main Thread through a normal static variable.

To see the full code of what is shown below, please go here.

ThreadFactory threadFactory = new ThreadFactory() {
    @Override    public Thread newThread(Runnable r) {
        return new Thread(r) {
            @Override            public void run() {
                r.run();
                MyLocalContext.passBack = MyLocalContext.threadLocal.get();
            }
        };
    }
};

ThreadPoolTaskExecutor executor = new ThreadPoolTaskExecutor();
executor.setThreadFactory(threadFactory);

class MyLocalContext {
    public final static ThreadLocal<String> threadLocal = new ThreadLocal<>();
    public static String passBack;
}

Saturday, August 26, 2017

Spring Boot Quiz 1 – 24.3 Application property file

What follows is a small quiz to determine  if one has understood the loading order of the application.yml file as describe in section 24.3 (Application property files) of the spring boot version 1.5.6.RELEASE documentation (shown below).


The object of the quiz is to determine the output of the HelloController, shown below, given the start command and the working directory.


@RestController
public class HelloController {

    @Value("${location}")
    private String location;

    @RequestMapping("/")
    public String index() {
        return String.format("Greetings from: %s", location);
    }
}


The next picture below shows the structure of the getting started spring boot repository (gs-spring-boot) as cloned from github and its location on my file system.

In various directories throughout the project, application.yml files have been created. In each file, one will find the absolute path of the file as an attribute called “location”.  For example, in the first top most application.yml file shown below in the picture, one will find: location:  
Z:\gs-spring-boot\application.yml


The first questions are based on the above file system structure. The gs-springboot.jar is a fat jar.

1.)

When started as follows:
Z:\>java -jar gs-spring-boot\complete\target\gs-springboot.jar


The loaded application.yml is:
Greetings from: Z:\gs-spring-boot\complete\src\main\resources\config\application.yml

Location described by line 3. 

Remember that the files in src\main\resources are copied into the classpath root of the resulting jar produced in the target directory. Locations 1 and 2 failed therefore 3 was used.


2.)

When started as follows:
Z:\gs-spring-boot>java -jar complete\target\gs-springboot.jar


The loaded application.yml is:
Greetings from: Z:\gs-spring-boot\config\application.yml

Location described by line 1. The config subdirectory  of the current directory.


3.)

When started as follows:
Z:\gs-spring-boot\complete>java  -jar target\gs-springboot.jar 


The loaded application.yml is:
Greetings from: Z:\gs-spring-boot\complete\config\application.yml

Location described by line 1. The config subdirectory  of the current directory.


4.)

When started as follows:
Z:\gs-spring-boot\complete\target>java -jar gs-springboot.jar


The loaded application.yml is:
Greetings from: Z:\gs-spring-boot\complete\src\main\resources\config\application.yml

Location described by line 3. The classpath root config subdirectory.


5.)

When started as follows:
Z:\gs-spring-boot>java -jar complete\target\gs-springboot.jar


The loaded application.yml is:
Greetings from: Z:\gs-spring-boot\application.yml

Location described by line 2. 1 failed there the properties file in current directory was loaded.


6.)

When started as follows:
Z:\gs-spring-boot>java -jar complete\target\gs-springboot.jar


The loaded application.yml is (line 2):
Greetings from: Z:\gs-spring-boot\complete\ src\main\resources\application.yml

Location described by line 4. 1, 2 and 3 failed.


7.)

When started as follows:
Z:\gs-spring-boot>java -jar complete\target\gs-springboot.jar  --spring.profiles.active=dev


The loaded application.yml is:
Greetings from: Z:\gs-spring-boot\config\application-dev.yml

Location described by line 1.


8.)

When started as follows:
Z:\gs-spring-boot\complete>java -jar target\gs-springboot.jar 
                                                             --spring.config.location=file:/gs-spring-boot/custom-config/


The loaded application.yml is:
Greetings from: Z:\gs-spring-boot\custom-config\application.yml


9.)

When started as follows:
Z:\gs-spring-boot\complete>java -jar target\gs-springboot.jar 
                                                             --spring.config.location=custom-config/ 
                                                             --spring.profiles.active=prod


The loaded application.yml is:
Greetings from: Z:\gs-spring-boot\complete\custom-config\application-prod.yml


10.)

When started as follows:
Z:\gs-spring-boot\complete>java -jar target\gs-springboot.jar 
                                                              --spring.config.location=custom-config
                                                               --spring.profiles.active=prod


The loaded application.yml is:
Greetings from: Z:\gs-spring-boot\complete\config\application.yml


11.

When started as follows:
java -jar target\gs-springboot.jar --spring.config.name=gs-spring-boot


Exception
Could not resolve placeholder 'location' in value "${location}"


12.

When started as follows:
Z:\gs-spring-boot\complete>java -jar target\gs-springboot.jar 
                                                              --spring.config.name=gs-spring-boot 
                                                              --spring.config.location=custom-config/


The loaded application.yml is:
Greetings from: Z:\gs-spring-boot\complete\custom-config\gs-spring-boot.yml


Friday, October 7, 2016

Metric prefix conversions made easy

This units conversion wheel was created to help my son visualize the process of converting the prefix of metric units; e.g. converting from milligrams to grams.  To use it, just select the units in the dropdown and then enter a number in the edit box. Then rotate the wheel to the desired units by rotating the wheel with either the mouse or swiping it with your finger.

Friday, May 27, 2016

Sources for a small maven multi-module project


This is a multi-module maven project that was created according to the sonatype maven tutorial, which can be found here: https://books.sonatype.com/mvnex-book/reference/multimodule.html.

The sources for the project can cloned from here: https://wmmnpr@bitbucket.org/wmmnpr/weather-parent.git

I created it so that I could experiment with deploying a webapp (weather-webapp), which was part of a maven multi-module project, to weblogic.

It appears that the source code referred to in the apache documentation (https://maven.apache.org/guides/mini/guide-multiple-modules.html) is no longer available.

Type "mvn install" in the weather-parent directory and all the modules should be built and deployed to weblogic, which you will undoubtly  have to reconfigured or remove. To make it work without weblogic just delete the weblogic-maven-plugin plugin and run it using jetty as in: mvn jetty:run

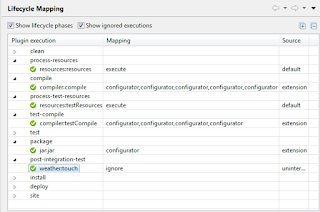
I threw in the plugin for no special reason other than that I needed a sample plugin project as well. The plugin was created with the "maven-archetype-plugin" and the webapp with the "maven-archetype-webapp". Its "touch" goal should execute during the compile phase of the default lifecycle; see the pom of weather-service module. Eclipse's Lifecycle Mapping show this nicely.


Once deployed, the webapp can be accessed by calling:  http://host:port/weather-webapp/weather, which should show "Windy".

Sorry, it's pretty boring but I was trying to keep it simple.