Sunday, September 15, 2024

Searching entire nebula.org variant calling file for pathogenic variants

The task was to search my Ultra Deep WGS VCF from nebula.org for all variants with a clinical significance of pathogenic. The webtool provided by nebula, gene.io.bio, is invaluable if one already knows which genes one would like to investigate but is not suited for searching all the variants which might have been found in one's sample. In my case, the variant calling file from nebula was nearly 256 MB, compressed.

To perform such a search, it was necessary to enrich my nebula.org VCF with the CLNSIG information provided by ClinVar in their VCF reference file.

The tool which ultimately helped me produce my desired results is called bcftool.  Rather than installing the tool locally, I used it in a Docker container running in Docker Desktop (v4.16.1) on my MacBook Pro (Sonoma 14.5). A subdirectory in my home folder on my Mac contained all the download files, which I mostly downloaded using my browser.


#use bcftool supplied in docker image to avoid local installation
docker run -it -v $HOME/nebula_data:/data mcfonsecalab/variantutils

A small issue was that one of the join columns, CHROM, is not the same between the variant reference file from ClinVar and the VCF from nebula; the step with awk is to prefix the chromosome number in the ClinVar file with "chr".

Below are the steps (don't forget that the command must be executed from within the docker container)

#download VCF file from nebula to localhost
MYNEBULAVCF.mm2.sortdup.bqsr.hc.vcf.gz

#index VCF if not downloaded from nebula
tabix -p vcf MYNEBULAVCF.mm2.sortdup.bqsr.hc.vcf

#download ClinVar VCF reference
wget ftp://ftp.ncbi.nlm.nih.gov/pub/clinvar/vcf_GRCh38/clinvar.vcf.gz

#decompress the clinvar.vcf.gz and copy it to a new file
bgzip -d clinvar.vcf.gz
cp clinvar.vcf clinvar.vcf.txt

#add "chr" to the chromosome number (CHROM) in the decompressed ClinVar file so that it will joined with the nebula VCF on CHROM and POS fields
awk '{if($1 ~ /^[0-9XYM]/) print "chr"$1substr($0, length($1) + 1); else print $0}' clinvar.vcf.txt > clinvar-adjusted.vcf.txt

#compress the adjusted file and index it
bgzip clinvar-adjusted.vcf.txt
tabix -p vcf clinvar-adjusted.vcf.txt.gz

#annotate file
bcftools annotate -a clinvar-adjusted.vcf.txt.gz -c CHROM,POS,INFO/CLNSIG -o MYNEBULAVCF-annotated.vcf -O z HHTLNHYJ4.mm2.sortdup.bqsr.hc.vcf.gz

#add gene name to VCF enriched file
wget ftp://ftp.ebi.ac.uk/pub/databases/gencode/Gencode_human/release_42/gencode.v42.annotation.gtf.gz

#decompress
bgzip -d gencode.v42.annotation.gtf.gz

#convert to BED file format
cat gencode.v42.annotation.gtf | awk '$3 == "gene"' | awk 'BEGIN{OFS="\t"} {print $1, $4-1, $5, $14}' > gencode_genes.bed

#add information to INFO field from gencode_genes.bed
bcftools annotate -a gencode_genes.bed -h <(echo '##INFO=<ID=GENE,Number=1,Type=String,Description="Gene name">') -c CHROM,FROM,TO,GENE -o HHTLNHYJ4-annotated_with_genes.vcf -O z HHTLNHYJ4-annotated.vcf


#filter pathogenic variants with grep
grep Pathogenic MYNEBULAVCF-annotated_with_genes.vcf > MYNEBULAVCF-pathogenic-filtered.vcf

#get just gene name
grep Patho MYNEBULAVCF-annotated_with_genes.vcf | sed -n 's/.*GENE="\([^"]*\)".*/\1/p'

#sort, filter unique and make a comma separated list
sort -u risk-genes.txt | tr '\n' ','

#gene list can be used in the gene.io.bio website
PERM1, ABCA4, EHBP1, WNT10A, AIMP1, ENPP1, SBDS, PRSS1, ADRA2A, ASXL3

Finally, take the list and use it in gen.io.bio as shown below:

Friday, June 7, 2024

Sniffing PM5 BLE traffic with nRF52840

What follows is the analysis of BLE data packets sent between the Ergdata app and the PM5 during a short fixed 100 meter distance workout. The packets were captured with the nRF52840 and Wireshark.  After capturing the session,  the packet dissections were exported to a JSON file  (File-> Export Packet Dissections -> As Plain Text).


Using the contents of the JSON file, it was possible to count the number of packets per characteristic with the following jq filter:


%jq  'group_by(.["_source"]["layers"]["btatt"]["btatt.handle_tree"]["btatt.uuid128"]) | map({uuid128: .[0]["_source"]["layers"]["btatt"]["btatt.handle_tree"]["btatt.uuid128"], count: length})' pm5-ergdata-airplus-extract.json


[

  {

    "uuid128": "ce:06:00:22:43:e5:11:e4:91:6c:08:00:20:0c:9a:66",

    "count": 8

  },

  {

    "uuid128": "ce:06:00:31:43:e5:11:e4:91:6c:08:00:20:0c:9a:66",

    "count": 172

  },

  {

    "uuid128": "ce:06:00:32:43:e5:11:e4:91:6c:08:00:20:0c:9a:66",

    "count": 169

  },

  {

    "uuid128": "ce:06:00:33:43:e5:11:e4:91:6c:08:00:20:0c:9a:66",

    "count": 169

  },

  {

    "uuid128": "ce:06:00:35:43:e5:11:e4:91:6c:08:00:20:0c:9a:66",

    "count": 21

  },

  {

    "uuid128": "ce:06:00:36:43:e5:11:e4:91:6c:08:00:20:0c:9a:66",

    "count": 11

  },

  {

    "uuid128": "ce:06:00:37:43:e5:11:e4:91:6c:08:00:20:0c:9a:66",

    "count": 1

  },

  {

    "uuid128": "ce:06:00:38:43:e5:11:e4:91:6c:08:00:20:0c:9a:66",

    "count": 1

  },

  {

    "uuid128": "ce:06:00:39:43:e5:11:e4:91:6c:08:00:20:0c:9a:66",

    "count": 1

  },

  {

    "uuid128": "ce:06:00:3a:43:e5:11:e4:91:6c:08:00:20:0c:9a:66",

    "count": 1

  },

  {

    "uuid128": "ce:06:00:80:43:e5:11:e4:91:6c:08:00:20:0c:9a:66",

    "count": 1

  }

]


One group of packets is related to the characteristic: ce:06:00:33:43:e5:11:e4:91:6c:08:00:20:0c:9a:66. The PM5 layout of the corresponding notification can be found in the concept2 SDK documentation as shown below.


The Dart code in a Flutter application (given one has already connected to the device and has discovered the services and their corresponding characteristics) to subscribe to such a characteristic might look as follows:

void _subscribeNotifications() {
//_notificationEnablerCharacteristic.write(List.from([0x01,0x00]));
_outputTextController.text += 'clicked _subscribeNotifications\n';
_strokeDataCharacteristic.setNotifyValue(true);
_strokeDataCharacteristic.onValueReceived.listen((data) {
String hexData = '${intArrayToHex(data)}\n';
String strokeData = json.encode(intListToStrokeData(data).toJson());
print("$hexData -> $strokeData");
}, onError: (error, stackTrace) {
_outputTextController.text += "Error $error\n";
}, onDone: () {
_outputTextController.text += "listen Done\n";
});
}

The intArrayToHex above looks like this:

String intArrayToHex(List<int> intArray) {
for (var value in intArray) {
if (value < 0 || value > 255) {
throw ArgumentError('All integers must be in the range 0-255.');
}
}

// Convert each integer to a two-character hex string and concatenate them
final hexStringBuffer = StringBuffer();
for (var value in intArray) {
hexStringBuffer.write(value.toRadixString(16).padLeft(2, '0'));
}
return hexStringBuffer.toString();
}
StrokeData intListToStrokeData(List<int> intList) {
StrokeData strokeData = StrokeData();
// @formatter:off
strokeData.elapsedTime = DataConvUtils.getUint24(intList, StrokeDataBLEPayload.ELAPSED_TIME_LO.index) * 10;
strokeData.distance = DataConvUtils.getUint24(intList, StrokeDataBLEPayload.DISTANCE_LO.index) / 10;
strokeData.driveLength = DataConvUtils.getUint8(intList, StrokeDataBLEPayload.DRIVE_LENGTH.index) / 100;
strokeData.driveTime = DataConvUtils.getUint8(intList, StrokeDataBLEPayload.DRIVE_TIME.index) * 10;
strokeData.strokeRecoveryTime = (DataConvUtils.getUint8(intList, StrokeDataBLEPayload.STROKE_RECOVERY_TIME_LO.index)
+ DataConvUtils.getUint8(intList, StrokeDataBLEPayload.STROKE_RECOVERY_TIME_HI.index) * 256) * 10;
strokeData.strokeDistance = DataConvUtils.getUint16(intList, StrokeDataBLEPayload.STROKE_DISTANCE_LO.index) / 100;
strokeData.peakDriveForce = DataConvUtils.getUint16(intList, StrokeDataBLEPayload.PEAK_DRIVE_FORCE_LO.index) / 10;
strokeData.averageDriveForce = DataConvUtils.getUint16(intList, StrokeDataBLEPayload.AVG_DRIVE_FORCE_LO.index) / 10;
strokeData.workPerStroke = DataConvUtils.getUint16(intList, StrokeDataBLEPayload.WORK_PER_STROKE_LO.index) / 10;
strokeData.strokeCount = DataConvUtils.getUint8(intList, StrokeDataBLEPayload.STROKE_COUNT_LO.index)
+ DataConvUtils.getUint8(intList, StrokeDataBLEPayload.STROKE_COUNT_HI.index) * 256;
// @formatter:on
return strokeData;
}
class StrokeData {
int elapsedTime = 0;
double distance = 0;
double driveLength = 0;
int driveTime = 0;
int strokeRecoveryTime = 0;
double strokeDistance = 0;
double peakDriveForce = 0;
double averageDriveForce = 0;
double workPerStroke = 0;
int strokeCount = 0;

Map<String, dynamic> toJson() {
return {
'elapsedTime': elapsedTime,
'distance': distance,
'driveLength': driveLength,
'driveTime': driveTime,
'strokeRecoveryTime': strokeRecoveryTime,
'strokeDistance': strokeDistance,
'peakDriveForce': peakDriveForce,
'averageDriveForce': averageDriveForce,
'workPerStroke': workPerStroke,
'strokeCount': strokeCount
};
}
}


Library still in-work is here: https://github.com/wmmnpr/ergc2_pm_csafe
The demo app is here:  https://github.com/wmmnpr/ergpm_diagnostics


Wednesday, March 22, 2023

Getting Ionic 6 to run on iOS 12+


The issue was to get ionic 6 running on an old iOS 12.5.7. 

At the time of writing this, ionic 6.20.9 and capacitor 4 where the latest versions. By rolling back to capacitor 3, it was possible to deploy the app to the old version 12 phone.

The nodejs version used was v18.14.0

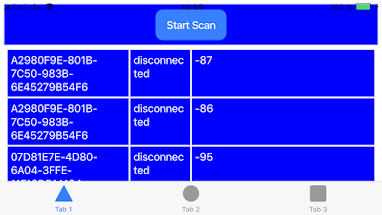
Below is the app shown listing the results of scanned devices using cordova-plugin-ble-central plugin.


As described here,  install ionic with:

npm install -g @ionic/cli

ionic --version

6.20.9

Then create a ionic project (Angular was chosen for this project)

ionic start

After the project has been created, remove version 4 of capacitor and install version 3 (https://capacitorjs.com/docs/v3/getting-started) as follows:

npm uninstall @capacitor/ios @capacitor/cli @capacitor/core --save

npm install  @capacitor/ios@latest-3 @capacitor/cli@latest-3 @capacitor/core@latest-3 --save

You should see 3.9.0 when running:

npx cap --version 

3.9.0

Then add the ios platform as described here: https://capacitorjs.com/docs/v3/ios

npx cap add ios

In the ios/App/Podfile file, you should see:

platform :ios, '12.0'

Now, build and deploy the project.

npm run build

npx cap sync

npx cap open ios

To add the plugin run:

npm i cordova-plugin-bluetoothle --save


Tuesday, March 21, 2023

A concept2 Remote Racing Prototype Architecture

This article is about a prototype which was created to connect together concept2 PM5 erg computers via the internet. The system makes it possible to remotely race each other in groups or races without a central organiser. 

A mobile app created with Ionic (see picture below) is used to connect to the local PM5 via Bluetooth. The app, called Ergregatta, sends data collected from the local PM5 computer to a remote server as well as displays realtime race information about other participants received from the remote server. 


The Ergregatta messing server is a Spring Boot app with a single web socket endpoint. The web socket handling is implemented Java-WebSocket from TooTallNate; a very nice, simple and clean implementation.

The server groups racers into races by using the raceId, a md5 hash of the username hosting the race, which submitted as a query parameter to the web socket endpoint before the connection upgrade.  

By hosting the server in a Kubernetes cluster, as shown below, it possible to get horizontal scaling of the servers, by using Istio to route web socket requests with the same raceId to the same server instance or pod (see below).


The installation show with kubectl. One can see the ergregatta message pods running.


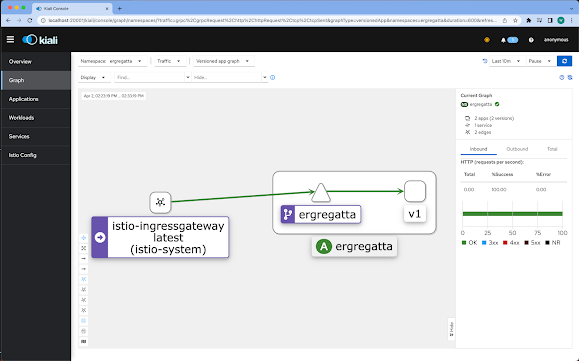
This is how the setup looks with Kiali, which is provided by the istio installation.


However, even better than Kiali, is a Grafana dashboard which shows the actual routing of the requests by pod.


Sunday, March 6, 2022

Deploying a microservice to Docker-Desktop's Kubernetes on Windows using Helm

What follows is a description of how to deploy a Springboot websocket microservice to a Kubernetes cluster running in Docker-Desktop. The prerequisites for the deployment are:

  1. The Springboot app has been dockerized
  2. Docker-Desktop (4.4.3) has been installed and Kubernetes (v1.22.5) enabled.
  3. kubectl (v1.22.5) has been configured to connected to k8 cluster started with Docker-Desktop
  4. Helm(v3.8.0) has been installed.
Create a subfolder in the Springboot project directory called helm. Below one see the result in Intellij and the contents of the simple Dockefile as well.


Change into the helm directory and run:

>helm create name-of-project   //here ergregatta-messaging-service


The Helm Chart Template Guild is a good place to learn about contents of the generated folder.

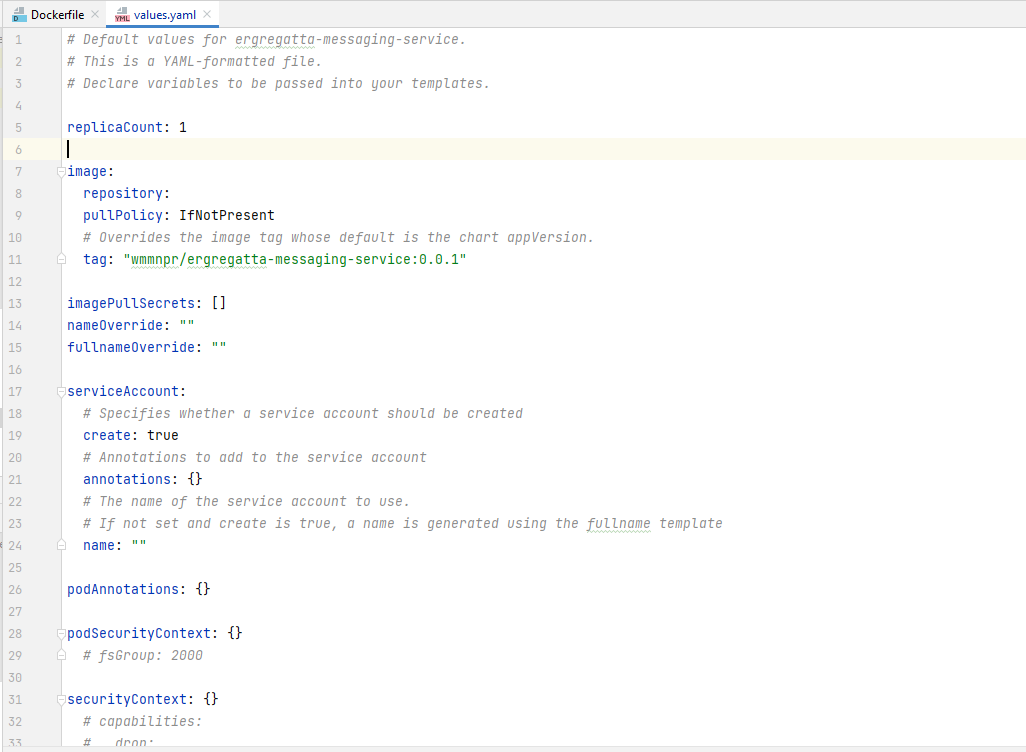
In the values.yaml file in the newly generated folder there were only a few things that had to be changed. The first and most obvious one being the "image.tag", shown below. It was set to point to the image in my local Docker image repository which came as a result of running docker build command.


Other changes, included, setting "ingress.enabled" to true and setting the "ingress.className" to "nginx". Which brings us to the next step.  Before deploying the microservice, one must deploy an ingress controller, which in this case was ingress-nginx. The helm command to do so was:

>helm install ingress-nginx ingress-nginx --repo https://kubernetes.github.io/ingress-nginx --namespace ingress-nginx --create-namespace

I also had to change the targetPort in the service.yaml file to match that of the port configured in the Dockerfile.

Also the hostname at which the microservice (k8 service) will be available to the outside needs to be configured in the values.yaml. The value in this case was:

ingress.hosts.host: rowwithme 

However, the hostname will only function properly if one, on Windows, adds it to the C:\Windows\System32\drivers\etc\hosts file. As in:

127.0.0.1 rowwithme 

Now, deploy the microservice by running:

>helm install rowwithme ergregatta-messaging-servic


Ok, maybe I should have used wscat but with the above screenshot one can see that the request is being forwarded to microservice running the the pod listening on port 5000

With kubectl once can see that ingress mapping has been processed by the ingress controller because othe the "HOSTS" column show below.